Handpiece Maintenance
Performing proper handpiece maintenance can prolong the life of your tools, keep them working like new and leaving them less likely to need frequent repairs. Each section below list procedures and tips you can use to improve the quality of your handpieces. The information is especially beneficial to someone who is unfamiliar with maintaining the handpieces.
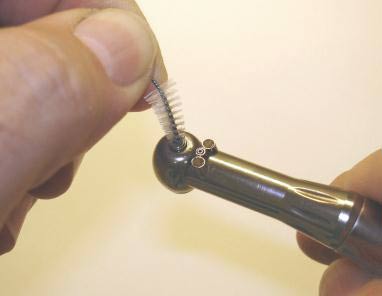
1. Clean the external surface with warm water using a cloth or brush.
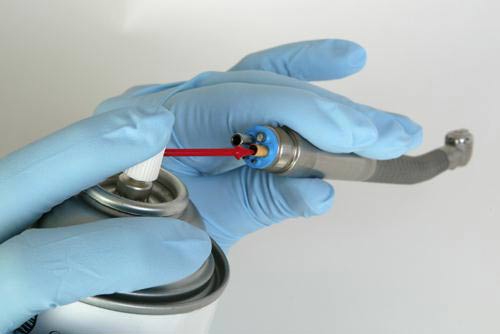
2. Insert a bur into the chuck of the handpiece. Spray lubricant into the drive air tube for 2 to 3 seconds until the lubricant comes out of the head of the handpiece. If the handpiece uses a quick disconnect coupler, use the appropriate adapter on the lubricant can.
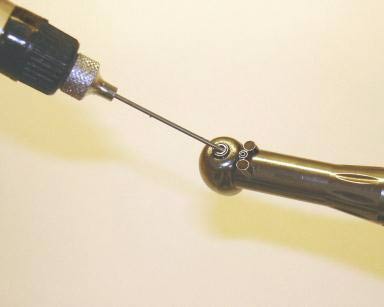
3. Slightly rotate the bur to loosen any debris in the head of the handpiece.
4. Attach the handpiece to the supply line. Run the handpiece for 10-20 seconds or until all lubricant is expressed from the head.
5. Remove the bur and wipe the handpiece to remove excessive lubricant.
6. Place the handpiece in a bag for autoclaving.
The push button chuck mechanism is made up of tiny, moving, metal parts that do need cleaning and lubrication to ensure safe performance, and extend the life of the chuck mechanism. It is necessary to clean the turbine autochuck once a week.
We recommend the following procedure:

Use the air syringe to spray air into the chuck to expel any loose material.
Motors:
1. Clean the external surface with warm water using a cloth or brush.
2. Dry with a paper towel.
3. Place three drops of oil or a one second blast of spray lubricant into the air tube.
4. Attach the motor to a supply line and operate for 30 seconds alternating the direction ring to disperse the lubricant.
5. Wipe the motor to remove excessive lubricant if necessary.
Nose Cones:
1. Remove from the motor and clean the external surface with warm water using a cloth or brush.
2. Dry with a paper towel.
3. Place three drops of oil or a one second blast of spray lubricant into the chuck and back end.
4. Attach the motor to a supply line and operate for 30 seconds until all lubricant is expressed.
5. Wipe the motor to remove excessive lubricant if necessary.
Contra Angle & Latch Heads:
1. Disconnect contra angle from the latch head.
2. Clean the external surface of each with warm water using a cloth or brush.
3. Dry with a paper towel.
4. Place three drops of oil or a one second blast of spray lubricant into both ends of the contra angle.
5. Place three drops of oil or a one second blast of spray lubricant into the chuck of the latch head and one drop of oil on each gear and center hole of the shaft .
6. Reassemble and attach to the motor and operate for 30 seconds until all lubricant is expressed.
7. Wipe the motor to remove excessive lubricant if necessary.
1. Remove handpiece from motor.
2. Clean the external surface of each with warm water using a cloth or brush.
3. Insert a bur into the chuck of the handpiece. Attach E-type adapter to the spray lubricant, insert the adapter into the back-end and spray for 2 to 3 seconds until the lubricant comes out the head of the handpiece.
4. Slightly rotate the bur to loosen any debris in the head of the handpiece.
5. Attach the handpiece to the motor. Run the handpiece for 10-20 sesconds or until all lubricant is expressed from the head. If the lubricant is discolored, repeat step #3 until lubricant is clear.
6. Remove the bur and wipe the handpiece to remove excessive lubricant.
7. Place the handpiece ina a bag for autoclaving.
“E” Type Motor
A motor with a standardized male fitting (connection) that accepts attachments with the matching female connection.
Air Motor
A slow speed handpiece without internal reduction gears or attachments, usually rotating at speeds near 20,000 rpm.
Attachment
a nose cone, angle, or electric speed increasing handpiece that quick disconnects on and off the front of a motor to provide various bur holding options.
Auto Chuck
A mechanism enabling the operator to change a bur without the use of a wrench, by pressing a button or raising a lever.
Autoclave
A steam sterilizer which destroys all living organisms through the medium of heat and pressure. Temperatures are raised to 2700-2750 F while the pressure is raised to 30 psi.
Bur
A rotary dental instrument, which when placed in a handpiece is used to cut or carve tooth structure. Burs come in a variety of shapes and sizes and can be made of high speed steel, carbide, or diamond coated material.
Canister Turbine
A closed cylinder which houses a rotating turbine assembly inside the head of the handpiece. Designed for easy replacement.
Ceramic Bearings
A handpiece bearing that incorporates ceramic balls, usually silicone nitride, instead of steel. Ceramic balls are harder but lighter than steel, thereby providing a longer wear life with less stress on the bearing retainer. Ceramic bearings can be utilized in a lubricated or lube free mode.
Chemiclave
A sterilizer which uses a chemical to generate chamber pressure instead of steam. The absence of water in the process reduces rust and oxidation of instruments.
Chip Air
Air supplied through the handpiece from the dental unit tubing to the cutting surface to cool the tooth or disperse the water spray, while flushing away residual material resulting from the removal of tooth structure.
Chuck
The part in the handpiece turbine used to hold the bur.
Collet
Another word for the chuck mechanism.
Connector
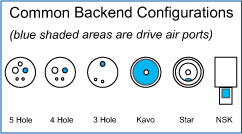
Attaches the handpiece to the dental delivery unit that supplies air and water to the handpiece. There are four types of standard U.S. connectors. They include the 2, or 3-Line (also called a Borden) and 4-Line. The 4-Line (also known as a Midwest) is the most popular connector. In a 4-Line connector, the holes are (1) drive air, (2) chip air, (3) water, and (4) exhaust. Sometimes a fifth line or hole is added for a fiber optic bundle. A newer type of connector, 6 Pin, is now available which provides an electrical connection for a fiber optic light bulb. Hole size and location are indicated by a standardized ISO specification.
Contra Angle
The front section of a handpiece which changes the desired angle to provide better bur access and visibility to the operator during use.
Coolant
Refers to the water spray directed at the bur to cool the tooth when cutting.
Doriot or Universal Angle
Any angle that operates on the front of a nose cone that has a protruding shaft designed to fit into the nose cone chuck.
Drive Air
The compressed air used to rotate the turbine in a dental handpiece.
End Cap
The cap, or cover which is removed to install the turbine.
Exhaust
The air discharged from a dental handpiece after spinning the turbine.
Exhaust
The air discharged from a dental handpiece after spinning the turbine.
Fiber Optic Handpiece
A handpiece through which a transparent fiber or cellular optic bundle transmits light to illuminate the oral cavity.
Friction Grip Chuck
A chuck which holds the bur strictly by friction generated from an internal spring assembly. The bur is simply pushed in and out of the chuck with a special tool using force to overcome friction.
Handpiece
A handheld device which engages rotary instruments for cutting, cleaning or polishing the teeth. A handpiece can be belt-driven, pneumatic (air or gas driven) or electric.
High Speed Handpiece
A handpiece which operates at a speed greater than 100,000 RPM.
Jacobs Chuck
A mechanism which utilizes a wrench to tighten the chuck. This design incorporates slots which create jaws that are compressed onto the bur shank when tightened with the corresponding wrench.
Latch Angle
An attachment that holds a specialized bur which is mechanically retained by the use of a swinging hook that engages a recess in the bur shank.
LED
Light emitting diode bulbs used in dental fiber optic applications, either in the handpiece, the handpiece connector, or in the fiber optic generator to provide a brighter light through the handpiece.
Low Speed Handpiece (or Slowspeed)
A handpiece which operates at speeds ranging from 5,000 to 20,000 rpm.
Lubricant or Oil
A liquid applied to moving parts of a handpiece or attachment in order to reduce friction, heat, or wear, or applied to surfaces in close contact to prevent them adhering to one another. May also include a solvent for cleaning.
Nosecone
A straight attachment used with a slow speed motor which holds a lab type bur (3/32″ shank) or any standard doriot attachment.
Prophy Angle
An angle that holds a brush or cup containing prophy paste used by a hygienist for cleaning teeth.
Quick-Disconnect
A handpiece attachment or fitting designed to allow easy separation of the handpiece from the supply tubing.
Replacement Cartridge
Another name for a high speed turbine, usually self contained to allow easy replacement.
Rotary Vane Motor
A type of low speed motor utilizing small vanes instead of a turbine to trap drive air in a rotor assembly to generate rotation.
RPM
Revolutions Per Minute. A unit of measurement indicating speed.
Straight Handpiece
Same as a low or slow speed handpiece. Often refers to a handpiece with a nosecone permanently “fixed” to the motor.
Swivel
Instead of threads at the rear of a handpiece, the swivel is usually a separate part that threads into the supply tubing and incorporates a quick disconnect. Designed to allow the handpiece to rotate where it attaches to the air supply tubing in order to reduce fatigue on the operators wrist.
Turbine
Located in the head of a high speed handpiece, the turbine holds the bur or cutting instrument while rotating from high pressure compressed air. A turbine consists of five components: spindle; chuck; impeller; bearings; and two “0” rings.